In this how-to guide, you will learn how to modify an EBS volume type, which we will demonstrate by upgrading an attached magnetic EBS volume to a PIOPS/General Purpose SSD EBS volume.
An Example Use Case
A news website is running their complete stack on Amazon Web Services (AWS) where all the news content is stored on magnetic EBS volumes. As they grow, they witness performance issues with their websites. On performing further analysis, they figured out the performance of their magnetic EBS volume is getting throttled around 200 IOPS and throughput is reaching the maximum capacity of 90MBps. In order to enhance system performance, they decided to move to General Purpose SSD volumes, which can offer up to 10,000 IOPS per volume and a max throughput of 160MBps. An additional advantage they found by moving to General Purpose SSDs is that it they offer upto 16TB of volume, compared to Magnetic volumes’ 1TB.Environment Details
- Region: US-East (Northern Virginia)
- Operating System: Linux and Windows
Step by Step
1. Identify the magnetic EBS volume attached to your instance
In order to identify the magnetic disk attached EBS volume, look at the instance details for block devices. When you click on the block device section, you might see: /dev/sda, /dev/sdf, /dev/xvda, or something along those lines. If you click on /dev/xvda, it will highlight the EBS volume that is attached to your instance. In most cases, /dev/sda or /dev/xvda denotes the root volume of your instance.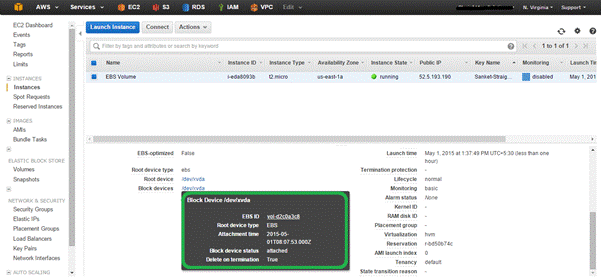 Clicking on ‘EBS volume ID’ will take you to the volume section of the EC2 services page.
If you are using the AWS CLI, please use the following command:
# aws ec2 describe-instance-attribute –instance-id <instance-id> –attribute blockDeviceMapping

2. Create a snapshot of your EBS volume
In order to create a snapshot of your EBS volume, right click on your EBS volume and click on ‘Create Snapshot’. It is usually recommended to stop the instance before the snapshot creation process begins in order to ensure data consistency. EBS snapshots can be easily managed and automated with CPM. If you are creating a snapshot of an additionally attached EBS volume (apart from the root volume), the volume can be unmounted and you can trigger the snapshot creation process.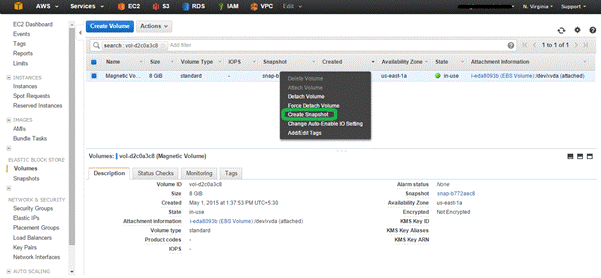 In order to create a snapshot of your EBS volume, you need to provide a name for and description of the snapshot.
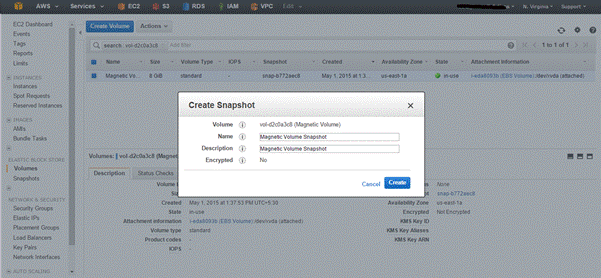 A unique snapshot ID will be generated. To have a look at your EBS snapshot, click on ‘Snapshot ID’ or navigate to the snapshot page and select your EBS snapshot.
If you are using the AWS CLI, use the following command to create an EBS snapshot :
# aws ec2 create-snapshot –volume-id <volume-id> –description Magnetic_to_SSD_Conversion
3. Track the progress of your EBS snapshot
To track the progress of your EBS snapshot creation, navigate to the snapshot section of the EC2 services page and select your snapshot ID.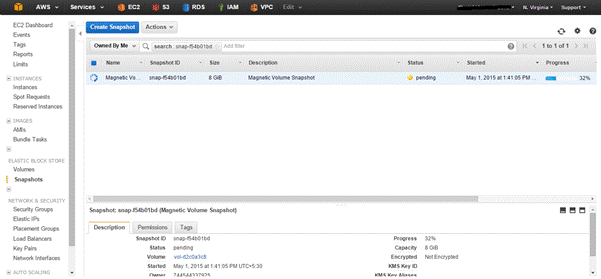 If you are using the AWS CLI, use the following command to view the status of your EBS snapshot:
# aws ec2 describe-snapshots –snapshot-ids <snapshot-id>
Here, ‘snapshot-id’ is the unique snapshot ID that was generated by the ‘create-snapshot’ command.
4. Create a new PIOPS/General Purpose SSD volume from your EBS snapshot
You can create a new General Purpose EBS SSD volume or PIOPS EBS SSD Volume from your EBS snapshot. Simply right click on your EBS snapshot and select ‘Create Volume’.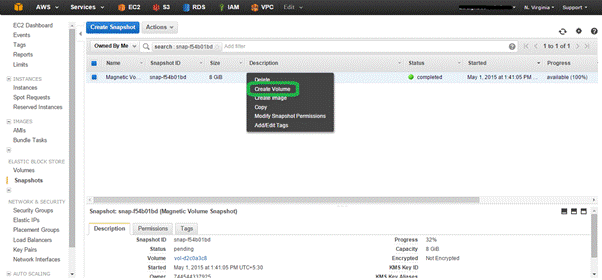 In the ‘Create Volume’ console, select the type of EBS volume (e.g., General Purpose (SSD) or Provisioned IOPS (SSD)).
For General Purpose (SSD) volumes, the ‘Create Volume’ console looks like:
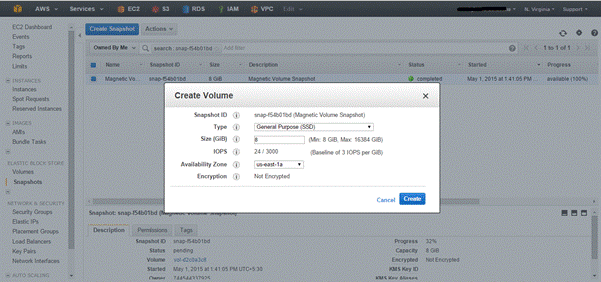 For Provisioned IOPS (SSD) volumes, the ‘Create Volume’ console looks like:
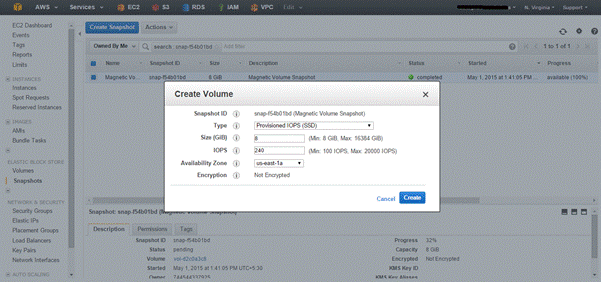 If you are using the AWS CLI, use the following command to create an SSD volume from the snapshot ID above:
# aws ec2 create-volume –snapshot-id <snapshot-id> –availability-zone <availability-zone> –volume-type <type-of-volume> –size <size-of-volume> –iops <iops>
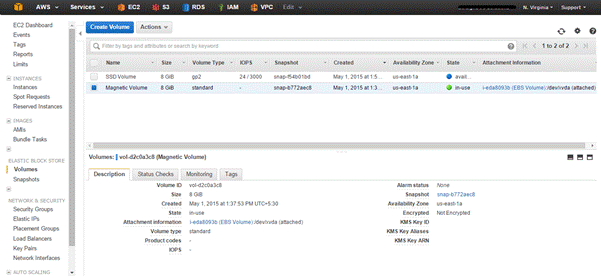 In order to view the status of the volume using the AWS CLI, use the following command:
# aws ec2 describe-volumes –volume-ids <volume-id>
5. Detaching an existing attached magnetic volume from the instance
In order to detach an existing attached magnetic volume from an instance, go to your original magnetic volume and right-click on it. Select ‘Detach Volume’. Note 1: Before detaching the volume, your instance should be in a stopped state. This will ensure that no application is accessing or writing on that volume. Incase, you don’t want to stop the instance, you can go-ahead and unmount the volume from the instance. Note 2: Please refer to the attachment information for this volume. This will be required when you attach a new volume on the same device, like /dev/xvda, /dev/sdf, etc.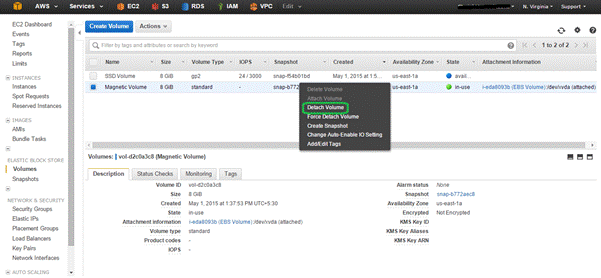 In order to detach a volume using the AWS CLI, use the following command:
# aws ec2 detach-volume –instance-id <instance-id> –volume-id <volume-id>
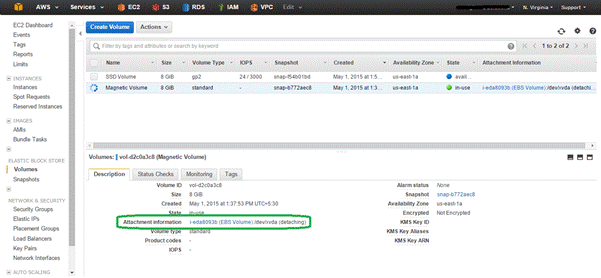 Once the volume is detached, you will witness both volumes in an available state.
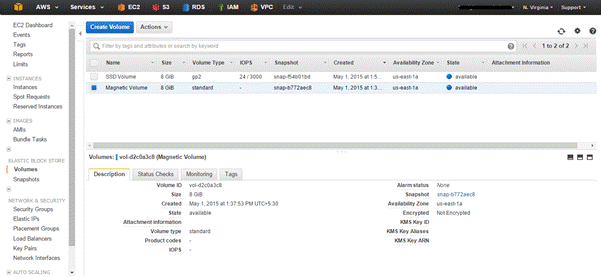
6. Attach a new PIOPS/General Purpose SSD volume
To attach a new PIOPS/General Purpose SSD volume, select and right click on the new volume. Select ‘Attach Volume’.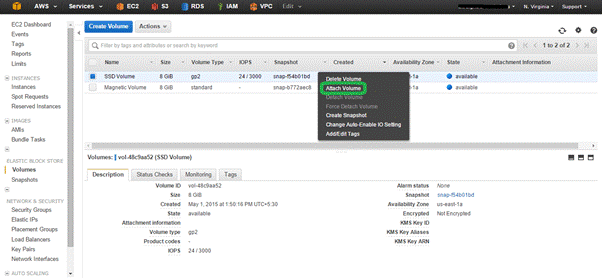 This will require the following information:
- Instance ID: The instance to which the volume should be attached.
- Device: The attachment point for this EBS volume. This should be the same as the magnetic volume. In this case, it is /dev/xvda.
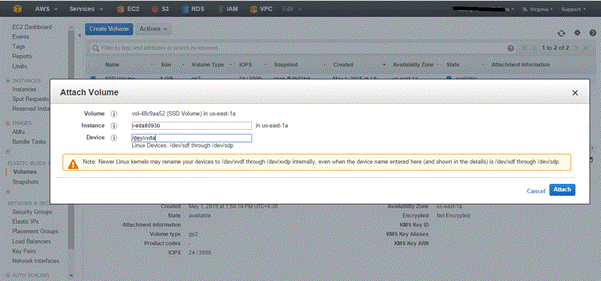 That’s it. The volume is now attached to your instance.
In order to attach a volume using the AWS CLI, please use the ‘attach-volume’ command as shown below:
# aws ec2 attach-volume –instance-id <instance-id> –volume-id <volume-id> –device <device-name>
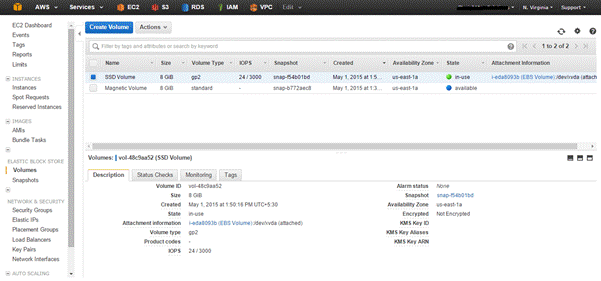 Once the volume is attached, you can review the volume’s status with the ‘describe-volumes’ command:
# aws ec2 describe-volumes –volume-ids vol-dc9ec537


